Basic knowledge of standard fasteners (4)
Chapter 2 Process Flow
1、 Production process:
1. Self tapping nail (clamp nail):

2. Mechanical screws:

3. Drill tail screw (cut tail screw):
Chapter 3 Mechanical Properties
1、 Mechanical property requirements for self tapping nails
1. Heart hardness: The standard value is HRC28-38, and the measured value of our company's products is approximately HRC31-33. When testing, take a section 1-2 times the nominal diameter from the tail. If the nominal length is too short, it can be embedded first and then the hardness can be measured.
2. Surface hardness: Standard MIN HV450, our company's product has been tested to be around HV530.
3. Carbonized layer: Standard 4 # -6 #: 0.05-0.18mm, 8 # -12 #: 0.10-0.23mm, 14 #: 0.13-0.28mm.
The main purpose of carburization is to enhance surface hardness and ensure the strength of teeth. If the decarburization is too deep and the carburization is insufficient, the strength of the teeth will not meet the requirements, which means that the teeth will be damaged during the screw in test.
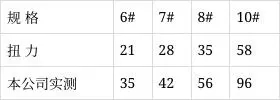
4. Torque:

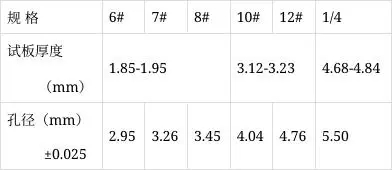
5. Screw in test: Screw the self tapping screw into a steel plate with reserved test holes. The self tapping screw should form a matching thread in the test plate, and the thread of the screw itself should not deform or be damaged until the end taper thread completely passes through the test plate. The screw in test is only applicable to self tapping screws of types AB, B, BP, etc. According to IFI regulations, the test plate should be prepared from semi hard low-carbon cold-rolled steel with a Rockwell hardness of 70-85HRB. The standard specifications for steel plates, including thickness, are shown in the table below. The test holes should be punched or drilled, with a tolerance of ± 0.025mm for the specified nominal diameter (see table below).

2、 Wall panel nails:
1. Heart hardness: standard: HRC24-45, our company's products have been tested to be around HRC35-38.
2. Surface hardness: Standard: HV600-800, our company's product has been tested to be around HV660-710.
3. Carbonized layer: 4 # -6 # 0.05-0.18mm, 8 # -12 # 0.10-0.23, 14 # 0.13-0.28
4. Bending degree: required to be 150-450
5. Salt spray test: usually MIN 48 hours.
6. Torque:

7. Attack Test: Please refer to Chapter 1 for details.
3、 Drill tail screw:
1. Heart hardness: Standard: HRC32-40. Our company's products have been tested to have HRC31.7-39.0.
2. Surface hardness: Standard: HV600-700. Our company's product has been tested to be around HV620.
3. Permeation layer: 4 # -6 #: 0.05-0.18mm
8#-12#:0.10-0.23mm
14#:0.15-0.28mm
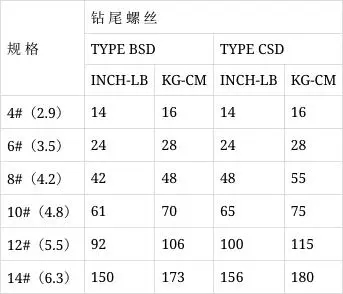
4. Torque:

5. The attack speed is described in Chapter 1.
Chapter 4 Surface Defects
1、 Analysis of the Common Adverse Phenomena and Reasons for Starting
1. Eccentricity: Poor installation and improper adjustment of the secondary punch.
2. Crooked head: Poor installation and improper machine adjustment.
3. Head not round: Improper selection of punching die or insufficient fullness in one punch molding.
4. Mold cracking: Mold cracking or improper R angle during mold making, causing the mold to be scraped off by two impacts.
5. Double layered head: Poor one punch molding.
6. Edge: Poor stamping, mainly caused by excessive gap between the punching rod and the die hole or too short punching rod.
7. Crack angle: The punching needle breaks or the second punch is not heavy enough to hit the mold.
8. Head cracking: Material issues, or incorrect use of a punching die (such as using a hexagonal Huasi head punching die for disc heads), as well as reasons related to lubricating oil.
2、 Analysis of Adverse Phenomena and Causes of Tooth Rolling
1. Processing cracks: worn tooth plate and improper machine adjustment.
2. Blunt tail: Improper machine adjustment, outdated tooth plate.
3. Burning: The distance between the two tooth plates is too large, or the feeding time is incorrect.
4. Crooked tail: The control screw on the tooth plate seat is too tight.
5. Tail breakage: Wear of the tooth plate and improper adjustment of the machine.
6. Yashan is not full: improper machine adjustment
7. The tail teeth have not been rubbed to the tip of the tail.
8. Straw rod: The correction block is not properly straightened.
9. Rough tooth base: The tooth spacing is not adjusted properly.

Post Comment