Summary of knowledge related to fasteners (4)
2、 Identification and Inspection of Threads
1. The purpose and characteristics of threads
Threads have a wide range of applications, from airplanes and cars to water pipes and gas pipes used in our daily lives. Most threads are used for fastening connections, followed by force and motion transmission. There are also some specialized threads, although there are many types, their quantity is limited.
The long-lasting use of threads is due to their simple structure, reliable performance, easy disassembly, and ease of manufacturing, making them an indispensable structural element in various electromechanical products today.
According to the purpose of the thread, various threaded parts should have the following two basic functions: first, good screw fit; The second is sufficient strength.
2. Classification of threads
a、 According to its structural characteristics and uses, it can be divided into four categories:
Ordinary thread (fastening thread): The tooth shape is triangular, used to connect or fasten parts. Ordinary threads are divided into coarse and fine threads according to pitch, with fine threads having higher connection strength.
Transmission thread: tooth shapes include trapezoidal, rectangular, saw shaped, and triangular.
Sealing thread: used for sealing connections, mainly consisting of pipe threads, cone threads, and cone pipe threads.
Special purpose thread, abbreviated as special thread.
b、 Threads can be divided into metric threads (metric threads), imperial threads, American threads, etc. according to region (country). We commonly refer to imperial threads and American threads as imperial threads, with tooth angles of 60 °, 55 °, etc. The diameter and pitch of the relevant thread parameters are measured in inches. And in our country, the tooth profile angle is unified at 60 °, and the diameter and pitch series in millimeters (mm) are used. At the same time, this type of thread is named as ordinary thread.
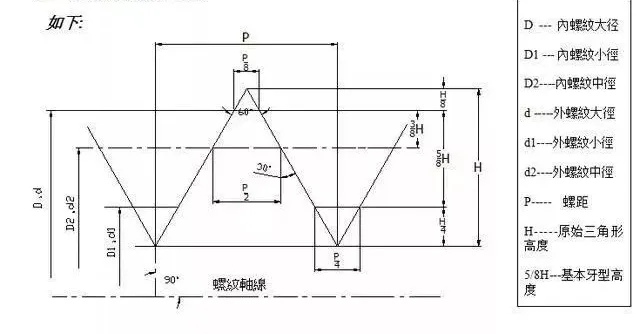
3. Ordinary thread profile

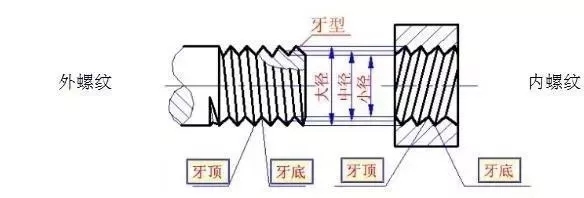
4. Basic terminology of threads
Thread: A continuous protrusion with a specified tooth profile formed along a spiral line on a cylindrical or conical surface.
External thread: a thread formed on the outer surface of a cylinder or cone.
Internal thread: An internal thread formed on the inner surface of a cylinder or cone.
Major diameter: The diameter of an imaginary cylinder or cone that is tangent to the crest of an external thread or the root of an internal thread.
Minor path: The diameter of an imaginary cylinder or cone that is tangent to the root of an external thread or the crest of an internal thread.
Zhongjing: The diameter of an imaginary cylinder or cone whose generatrix passes through grooves and protrusions of equal width on the tooth profile. This hypothetical cylinder or cone is called a medium diameter cylinder or medium diameter cone.

Right hand thread: a thread that is screwed in when rotated clockwise.
Left hand thread: a thread that is screwed in when rotated counterclockwise.
Tooth profile angle: The angle between two adjacent tooth sides on a threaded tooth profile.
Pitch: The axial distance between two adjacent teeth on the centerline corresponding to two points.
5. Marking of threads
Metric thread marking:
In general, a complete metric thread marking should include the following three aspects:
a. Thread type code representing thread characteristics;
b. The size of threads should generally consist of diameter and pitch, and for multi thread threads, it should also include lead and number of threads;
c. The accuracy of threads: The accuracy of most threads is determined by the tolerance zone of each diameter (including the position and size of the tolerance zone) and the length of the threaded joint.

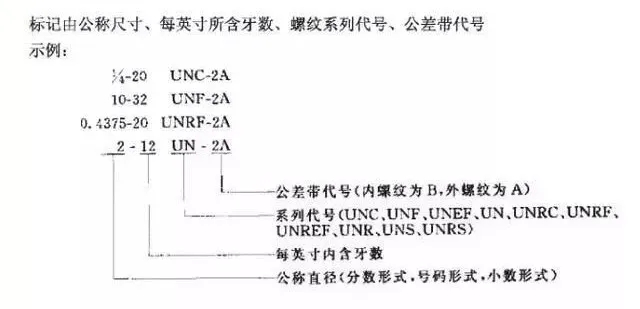
British thread marking:

6. Thread measurement
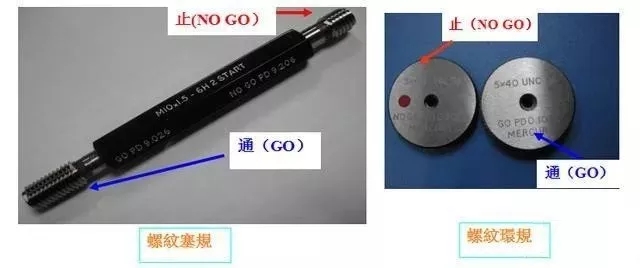
For general standard threads, thread ring gauges or plug gauges are used for measurement.
Due to the large number of thread parameters, it is impossible to measure every parameter of the thread one by one. Usually, we use thread gauges (thread ring gauges, thread plug gauges) to comprehensively judge the thread. This inspection method belongs to the simulation assembly acceptance method, which is not only convenient and reliable, but also comparable to the accuracy requirements of ordinary threads. Therefore, it has become the most commonly used acceptance method in actual production.

7. Thread measurement (pitch diameter)
In threaded connections, only the pitch diameter size determines the nature of the thread fit, so it is crucial to correctly determine whether the pitch diameter is qualified. Based on the size of the pitch diameter, the most basic performance of the thread should be ensured to achieve this goal. The standard stipulates the principle of judging the qualification of the pitch diameter, which is: "The actual pitch diameter of the thread cannot exceed the pitch diameter of the largest solid tooth profile. And the single pitch diameter of any part of the actual thread cannot exceed the pitch diameter of the smallest solid tooth profile
There are currently two convenient methods for measuring a single pitch diameter: one is to use a thread pitch micrometer to measure the pitch diameter, and the other is to use a three needle method for measurement (our company uses a three needle method for measurement).


Post Comment