Basic knowledge of standard fasteners (1)
Part One Basic Knowledge
Chapter 1 Measurement
There are two main units of measurement for length in the world today. One is the metric system, with units of measurement such as meters (m), centimeters (cm), millimeters (mm), etc., which are commonly used in Southeast Asia such as Europe, China, and Japan. The other is the imperial system, with units of measurement mainly in inches (inch), which is equivalent to the old system of measurement in China. It is more commonly used in European and American countries such as the United States and the United Kingdom.
1. Metric measurement: (base 10)
1m =100 cm=1000 mm

2. Imperial measurement: (base 8)
1 inch=8 inches/minute 1 inch=25.4 mm 3/8 ¢¢× 25.4=9.52

3. Products below 1/4 ¢ are referred to by a serial number, such as:
4#, 5#, 6#, 7#, 8#, 10#, 12#
Chapter 2 Thread
1、 A thread is a shape with a uniform spiral protrusion on the cross-section of the outer or inner surface of a solid. According to its structural characteristics and uses, it can be divided into three categories:
(1) Ordinary thread: The tooth shape is triangular, used to connect or fasten parts. Ordinary threads are divided into coarse and fine threads according to pitch, with fine threads having higher connection strength.
(2) Transmission thread: tooth shapes include trapezoidal, rectangular, saw shaped, and triangular.
(3) Sealing thread: used for sealing connections, mainly consisting of pipe threads, cone threads, and cone pipe threads.
2、 Thread fit grade:
Thread fit refers to the size of looseness or tightness between the threads, and the grade of fit is the specified combination of deviation and tolerance acting on the internal and external threads.
(1) For the unified imperial thread, there are three thread grades for external threads: 1A, 2A, and 3A, and three grades for internal threads:
1B, 2B, and 3B levels are all gap fit. The higher the level number, the tighter the cooperation. In the British thread system, the deviation is only specified for grades 1A and 2A, with zero deviation for grade 3A, and equal grade deviation for grades 1A and 2A.
The larger the number of levels, the smaller the tolerance, as shown in the figure:

1. Class 1A and 1B, very loose tolerance grades, suitable for tolerance fit of internal and external threads.
2. 2A and 2B grades are the most commonly used thread tolerance grades for British series mechanical fasteners.
3. 3A and 3B grades, screw fit to form the tightest fit, suitable for fasteners with tight tolerances, used for critical safety designs.
4. For external threads, there is a fitting tolerance for Class 1A and 2A, but not for Class 3A. Grade 1A tolerance is 50% larger than Grade 2A tolerance and 75% larger than Grade 3A tolerance. For internal threads, Grade 2B tolerance is 30% larger than Grade 2A tolerance. Grade 1B is 50% larger than Grade 2B and 75% larger than Grade 3B.
(2) Metric threads have three thread grades for external threads: 4h, 6h, and 6g, and three thread grades for internal threads: 5H, 6H, and 7H. In metric threads, the basic deviation of H and h is zero. The basic deviation of G is positive, while the basic deviations of e, f, and g are negative. As shown in the figure:

H is a commonly used tolerance zone position for internal threads, and is generally not used as a surface coating or with an extremely thin phosphating layer. The basic deviation of G position is used in special occasions, such as thicker coatings, and is generally rarely used.
2. G is commonly used to coat thin coatings of 6-9um. If the product drawing requires a bolt to be plated for 6h, the thread before plating should have a tolerance band of 6g.
3. The best combination of thread fit is H/g, H/h, or G/h. For refined fasteners such as bolts and nuts, the standard recommends using a 6H/6g fit.
(3) Thread marking

3、 Main geometric parameters of mechanical threads:
(1) Major diameter/tooth outer diameter (D, d): refers to the imaginary cylindrical diameter where the external thread crest or internal thread root coincide. The major diameter of the thread basically represents the nominal diameter of the thread size.
(2) Medium diameter (D2, d2): D2=d2=D (d) -2x3H/8, where H is the height of the original triangle:
(3) Small diameter/root diameter (D1, d1): refers to the diameter of an imaginary cylinder where the external thread crest or internal thread crest coincides.
H=(√ 3/2) P=0.866025P (60O Yashan Corner); H=0.960491P (55 O Yashan Corner)
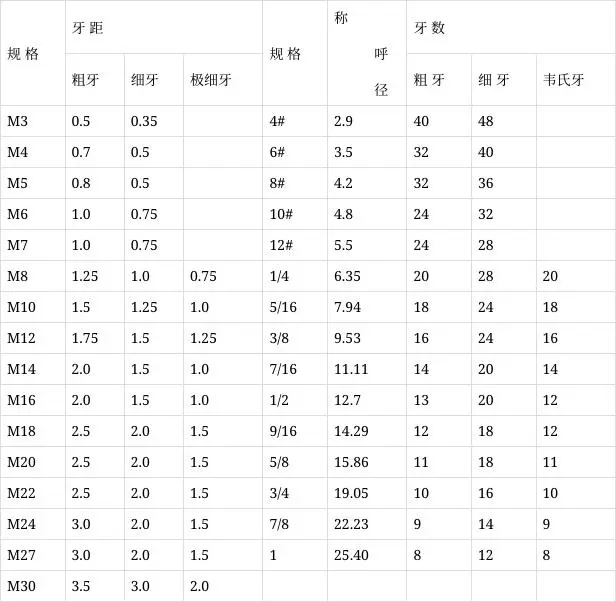
(4) Pitch (P): refers to the axial distance between two points corresponding to adjacent teeth on the centerline, or the distance between adjacent tooth ridges or two adjacent tooth valleys. In the imperial system, the tooth spacing is indicated by the number of teeth per inch (25.4 mm) (as shown in the table below).

(5) Half angle of tooth profile (α/2): The angle between the tooth flank and the perpendicular line of the thread axis. The half angle of a regular thread profile is 60O/2, while the half angle of a Webster's (BSW) thread profile is 55O/2. Generally, the angle of the wooden screw teeth is 60 degrees, and the angle of the tail tip is 60 degrees.
(6) Thread engagement length: refers to the length of the mutually engaged portion along the thread axis direction of the two mating threads.
4、 The main geometric parameters of self tapping and self drilling threads are:
The major diameter/tooth outer diameter (d1) is the imaginary cylindrical diameter where the thread crest coincides. The major diameter of the thread basically represents the nominal diameter of the thread size.
Minor diameter/tooth root diameter (d2): is the imaginary cylindrical diameter of the thread root overlapping.
Tooth spacing (p): refers to the axial distance between two corresponding points on the midline between adjacent teeth. In the imperial system, tooth spacing is indicated by the number of teeth per inch (4mm).
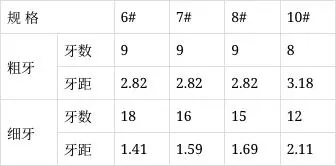
The following table lists commonly used specifications of tooth spacing (metric) and tooth count (imperial)
1. Metric self tapping teeth:

2. British Self Attack Teeth:

3. Japanese standard wall panel nails:

4. Mechanical screws (mechanical teeth):

5. Drill tail screws: There are two types of drill tail screws: CSD (mechanical teeth) and BSD (self tapping AB teeth). The tooth spacing or number can refer to mechanical screws (CSD teeth) and self tapping screws (BSD teeth), respectively.
(4) Yashan angle and tail tip angle: Yashan angle refers to the angle between the tooth sides, and tail tip angle refers to the tip angle at the end of the thread.
1. Self attacking teeth: The angle of the tooth mountain is 60 degrees, and the angle of the tail tip is 45 degrees ± 5 degrees.
2. Wall panel nail: The tooth angle is 60O (can also be produced according to customer requirements, such as 45 O ± 5 O), and the tail tip angle is 25 O ± 3O.
3. Splint nail: (Chip board screws) The tooth angle is 40 O ± 3 O, and the tail tip angle is 25O ± 3 O or 34O ± 3 O (customer specific requirements).
4. Drill tail screw: The tooth angle is 60 O ± 5 O, and different types of tail clamps are selected for different specifications of products. The main geometric parameters of the tail clamp are the tail clamp diameter and extension.
Chapter 3 Materials
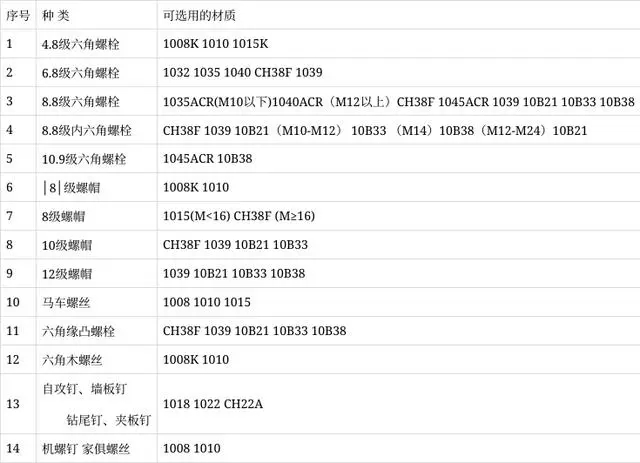
1、 At present, there are three main materials for standard parts on the market: carbon steel, stainless steel, and copper.
(1) Carbon steel. We distinguish low carbon steel, medium carbon steel, high carbon steel, and alloy steel based on the carbon content in the carbon steel material.
1. Low carbon steel with a C% ≤ 0.25% is commonly referred to as A3 steel in China. Abroad, it is commonly referred to as 1008101510181022, etc. Mainly used for products without hardness requirements such as grade 4.8 bolts, grade 4 nuts, and small screws. (Note: Drill tail nails are mainly made of 1022 material.)
2. Medium carbon steel with a content of 0.25%<C% ≤ 0.45% is commonly referred to as 35 # and 45 # steel in China, and is commonly referred to as 1035, CH38F, 1039, 40ACR, etc. in foreign countries. Mainly used for grade 8 nuts, grade 8.8 bolts, and grade 8.8 hexagon products.
3. High carbon steel C%>0.45%. Currently, it is not widely used in the market
4. Alloy steel: Adding alloy elements to plain carbon steel to enhance some special properties of the steel, such as 35, 40 chromium molybdenum, SCM435, 10B38. Fanwo screws mainly use SCM435 chromium molybdenum alloy steel, which is mainly composed of C Si、Mn、P、S、Cr、Mo。
(2) Stainless steel. Performance levels: 45, 50, 60, 70, 80
Mainly divided into austenite (18% Cr, 8% Ni) with good heat resistance, corrosion resistance, and weldability. A1, A2, A4 martensite and 13% Cr have poor corrosion resistance, high strength, and good wear resistance. C1, C2, C4 ferritic stainless steel. 18% Cr has better forging properties and stronger corrosion resistance than martensite. At present, the imported materials in the market are mainly Japanese products. Mainly divided into SUS302, SUS304, and SUS316 by level.
(3) Copper. The commonly used materials are brass... zinc copper alloy. H62, H65, and H68 copper are mainly used as standard components in the market.
2、 Disk elements used in carbon steel products:

3、 The influence of various elements in materials on the properties of steel:
1. Carbon (C): improves the strength of steel parts, especially their heat treatment performance, but with the increase of carbon content, plasticity and toughness decrease, and it will affect the cold heading performance and welding performance of steel parts.
2. Manganese (Mn): enhances the strength of steel components and to some extent improves their hardenability. During quenching, the strength of hardened infiltration is increased, and manganese can also improve surface quality. However, too much manganese is detrimental to ductility and weldability. And it will affect the control of the plating layer during electroplating.
3. Nickel (Ni): improves the strength of steel parts, enhances toughness at low temperatures, improves resistance to atmospheric corrosion, and ensures stable heat treatment effects, reducing the effect of hydrogen embrittlement.
4. Chromium (Cr): can improve hardenability, wear resistance, corrosion resistance, and maintain strength at high temperatures.
5. Molybdenum (Mo): It can help control hardenability, reduce the sensitivity of steel to temper brittleness, and have a significant impact on improving tensile strength at high temperatures.
6. Boron (B): can improve hardenability and help induce the expected reaction of low carbon steel to heat treatment.
7. Alum (V): Refine austenite grains and improve toughness.
8. Silicon (Si): Ensuring the strength of steel components, appropriate content can improve the plasticity and toughness of steel components.
4、 Introduction to the Characteristics of Stainless Steel Materials (304, 316)
These three materials are all 300 series austenitic stainless steel, with the following chemical composition:

The relationship between the main chemical components and the properties of stainless steel:
1. Carbon C can increase hardness and strength, while excessive content can reduce its ductility and corrosion resistance
2. Chromium Cr can increase corrosion resistance, oxidation resistance, refine grain size, increase strength, hardness, and wear resistance
3. Nickel Ni can increase high-temperature strength, corrosion resistance, and reduce the rate of cold work hardening
4. Molybdenum Mo increases strength and has excellent corrosion resistance to oxides and seawater
5. Copper Cu is conducive to cold working forming and reduces magnetism
(3) Other properties of the material
1. The above materials are non-magnetic in normal condition. 304M has slight magnetism after cold processing (around 1.6u-2.0u); The magnetic properties of 304HC are around 1.01u-1.6u; The magnetic properties of 316 material after cold processing are less than 1.01u.
2. All materials have good ductility, are easy to form through cold processing, and can meet the requirements for tensile strength and yield strength. (Ts tensile strength min 700N/mm, Ys yield strength min 450N/mm)
(4) Conclusion
1. 304M, 304HC, and 316 are currently one of the most widely used materials for the 300 series austenitic stainless steel. The significant differences among the materials are: after cold processing, the magnetic properties of the material are 316<304HC<304M. 316 material has better resistance to chemical corrosion, pitting corrosion, and seawater corrosion compared to 304M and 304HC.
2. In summary, the characteristics of stainless steel standard parts are corrosion resistance, aesthetics, and hygiene, but their strength and hardness are equivalent to carbon steel (grade 6.8) under normal circumstances. Therefore, stainless steel products should not be impacted or knocked, and attention should be paid to maintaining their surface smoothness and accuracy. In addition, force should not be applied casually or excessively like when using carbon steel products. At the same time, due to the good ductility of stainless steel, steel shavings are prone to stick to the nut teeth during use, increasing friction and easily causing locking. Even if iron shavings are generated when using carbon steel, they will fall off, which is relatively difficult to lock compared to stainless steel.

1 Comments